
I had one of these years ago. I wasn't an expert or anything. But I remember it was fun.
Jane Austen loved to play
Bilbocatch with her nieces and nephews. And as I hear it, she was really good at it.
This toy can be fun for boys and girls at any
age (4 to 104).
The goal of the game is to get the ball in the
cup: Hold the handle and let the ball
hang free.
Then swing the ball up, and aim for the
cup. One point is made for every
successful catch.
When there is a miss, the points revert to
zero. See how many points you can get.
Keep your eye on the ball. With a bit of practice, it can be mastered.
ENJOY!
Notes:
Rounds are worked in a spiral.
Mark the beginning of the rounds.
I use a running thread or yarn to mark
rounds, and a safety pin to mark individual stitches or loops.
Work over the beginning yarn end to eliminate
weaving it in later.
Be sure to close the center hole of the Magic
Ring.
I
usually give it a final tug after the first couple stitches of round 2.
Keep all the stitches tight.
Sugar n Cream yarn recommends a 5 mm / H hook
size. Using a 3.5 / E hook will produce sturdier stitches.
If
you find that too daunting, an F / 3.75 will also work.
The cord that connects the ball and cup/handle is about 12 inches.
If you want, you can make it a bit
longer. It does not make the game easier
or harder.
It just produces a different approach to
the swinging and catching of the ball.
Optional: The outer-sides (rounds 13 through 19) can be decorated with appliques:
Sewn or glued on.
Optional: A little bit of weight tucked into
the stuffing can be added to the ball for balance.
I used a (US) Penny with stuffing tightly around
it, and it worked fine.
A 3/8th inch Hex Nut works great,
too.
A
3/4” (1.9 cm) washer (about the size of a penny – not shown) might work.
A 1/4”
(0.6 cm) ball-bearing or a pachinko ball might work, too.
However,
Fiberfill alone works fine for the ball.
If
adding a little weight, be sure to surround it completely with Fiberfil-Stuffing.
Make
sure it is not too heavy. A weighted
swinging ball could cause a bruise.

Materials:
WW Cotton Various colors (Solid or Variegated)
Weight
Category: 4 Medium
(I
used Sugar n Cream)
~ 54 yards Total
Cup = ~37 yards
Handle = ~10 yards
Ball = ~7 yards
3. 50 mm / E hook
Fiberfil Stuffing for the
handle and ball.
Yarn needle to weave in
end.
Optional: Small weight for the ball (see notes above)
Gauge is not crucial.
10 sts /
10 rows = 2” (5.1 cm)
Rnds 1–3 (in pattern) = ~1.75” (~4.4 cm)
Finished Size: Cup and Handle ~ 5.5” (14 cm) Tall
Ball ~ 1.5” (3.8 cm)
Diameter
Skill Level: Fairly Easy
Abbreviations
~ = about
Ch = chain
FO = fasten off
DEC = decrease / single crochet 2 sts together
FO = fasten off
DEC = decrease / single crochet 2 sts together
J-DEC = joining decrease
J-Sc = joining single crochet
INC =
increase / 2 single crochets in one stitch
MR = magic ring
Rnd(s) = round(s)
Sc = single crochet
Sk = skip
Sk = skip
Ss = slip stitch
St(s) = stitch(es)
US Terminology
Regarding
copyright:
This is a free pattern for your
personal use.
You are welcome to sell any items
that you make.
But please, do not sell the pattern or reproduce the text without permission.
CUP:
Rnd 1: MR, Ch 1, 7
Sc in Ring. (7)
Rnd 2: INC around. (14)
Rnd 3: Mark the back loop of the first stitch of this
round.
Work
this round in the Front Loops Only:
(Sc, INC) around.
(21)
The 14 free (unused) back loops of Rnd 2 will be
used later in Rnd 21.
Rnd 4: (Sc in 2, INC) around.
(28)
Rnd 5: (Sc in 3, INC) around.
(35)
Rnd 6: INC in the first st. Sc around.
(36)
Rnds 7-19: Sc around.
(13 rounds of 36 sc)
Note:
Decreases for Round 20 can be made in the
front loops of the stitches, but it is not essential.
Using the
front loops for a decrease, produces a less bulky stitch.
Rnd 20: (Sc, DEC)
around. (24)
Now, it looks something like an elongated doll head
(Photo 1).
Push Round 1 down inside Rounds 13 through 20.
Smooth the edges so it rests even.
It should take the shape of a cup (Photo 2).
Rounds 11 and 12 will spiral over the top edge-rim
of the cup.
On the bottom, the fourteen free unused loops
should be visible and inside the working round (Photo 3).

****** Round 21 is the joining round to connect
the 14 (unused) free back loops of Round 2.

******
Special Joining Stitches for this next
round:
First Joining Decrease [J-Dec] for Round 21:
·
Insert the hook through the next stitch
(Rnd 20 only),
·
Yarn over, and pull up a loop.
·
Then Insert the hook through BOTH the next st of Rnd 20 and
then through the Marked
stitch (the first unused loop) of Rnd 2 (Photo 4).
·
Yarn over, and pull a loop through both.
·
Yarn over again, and pull through all 3
loops to complete the decrease
(Photo 5).
·
Remove the stitch marker
from the Marked
stitch.

Subsequent Joining Decreases [J-Dec] for Round 21:
· Insert the hook through the next stitch (Rnd 20 only),
· Yarn over, and pull up a loop.
· Then Insert the hook through BOTH
the next st of Rnd 20 and then through the next free loop of Rnd 2.
· Yarn over, and pull a loop through both.
· Yarn over again, and pull through all 3 loops to complete the decrease.
Joining Single Crochets [J-Sc] for Round 21:
· Insert the hook through BOTH
the next stitch of Rnd 20 and the next
free loop of Rnd 2.
· Yarn over, and pull the loop through both.
· Yarn over again, and pull through the 2 loops to complete the single crochet.
Rnd 21: Using the special joining
stitches above:
(J-DEC twice,
J-Sc)
four times. J-DEC two more times. (14)
Note: The
last free loop is sometimes hard to see.
If you have difficulty locating it, the last decrease can be made using
the same joined-free-loop that was used for the previous stitch.
HANDLE:
Keep the stitches tight so the stuffing will not show through the
handle.
As
you work, stuff the handle tightly.

Rnds 1-13: Sc around.
(13 rounds of 14 sc)
Rnd 14: Dec 4 times.
Finish
Stuffing.
Dec 3 more times.
Join
with a Ss in next st. (7)
FO
with end to sew the opening closed.
Weave in and out through the outer loops of the
last round.
Pull the opening closed, secure and weave in the
end.
Ball:
Rnd 1: MR, Ch 1, 7
Sc in Ring. (7)
Rnd 2: Inc around. (14)
Rnd 3: (Sc, Inc)
around. (21)
Rnd 4: Sc
around. (21)
Rnd 5: (Sc, Dec)
around. Join. (14)
Rnd 6: Dec 4
times.
Stuff.
If you plan to add a bit of weight, make
sure you completely surround the object with stuffing.
Common sense is advised. Fiberfill
alone works fine for the ball.

Dec 3 more
times.
Join with a Ss in next st. (7)
Do not fasten off yet. Continue
to the cord.

CORD:
·
Measure about two yards: (~72”
/ 183 cm) (Photo 9).
Cut yarn and
pull end through the last loop (as normally done, when fastening off).
·
Finish stuffing
tightly (Photo 10).

·
Thread yarn needle
with the free end of the yarn and carefully weave in and out through the outer
loops of the last round (Photo 11).
It is easiest,
if the entire yarn end is pulled
individually through each of the 7 stitches.
Be careful not to tangle the yarn.
·
Pull the opening
closed, and secure the end, but DO NOT CUT THE YARN yet (Photo 12).
·
Insert the needle
up through the center of the ball and pull the yarn all the way through.
·
Then re-insert the
needle down through the same center and out between the last two rounds (Photo 13).
·
Pull the yarn, but
leave a loop before pulling the yarn all the way through (Photo 14).

·
Remove
the yarn needle. Place your hook in the loop, and tighten the yarn
around it (Photo 15).
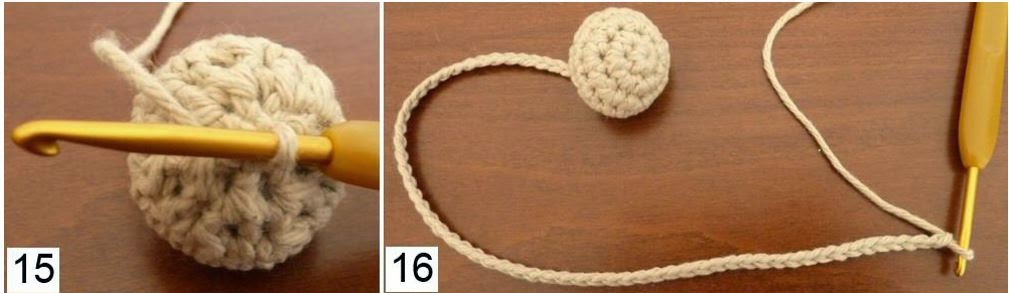
Ch 70.
Make sure the chains are snug and even (Photo 16).
[Chained portion = ~12” / 30.5 cm. It can be made a bit longer, if you like.]
·
Remove the hook and
pull the yarn through the last chain (as normally done when fastening off).
·
Re-thread the
needle with the free end, and make a stitch all the way through the center of
the handle, right below the cup (Photo 17).
·
Pull the yarn through and
make sure the chain-cord section is snug up against the handle (Photo 18).
·
Anchor the yarn with a
back stitch (Photo 19).
·
You can weave it in, at
this point, or back stitch all the way around the bottom of the cup.

Side Note:
If you want
the cord to be a different color, you can always just fasten off the ball with
an end to sew the opening closed.
And then
make the chain cord, and sew one side to the cup/handle and the other to the
ball.
One last note: I designed this
pattern to be worked in a spiral so
there would be no visible seam.
My first prototype actually had joined
rounds, so it was easier to embroider and backstitch designs more evenly.
If you do not mind having a seam that runs
down the side, you can Ch-1 at the beginning of the rounds and join with a
slip-stitch at the end of the rounds. Before you form the cup shape,
backstitch or embroidery can be added to Rnds 13 through 19 on the outer-sides.


The Pink Bilbocatch shows with a blue ball and yarn string only.
The Blue Bilbocatch shows an orange ball with a string of chains.
Happy Crocheting
And Keep Smiling!
A special thank you to Carol Derbis and Joy Merrill
for graciously testing this pattern.

© 2015
P Perkins